
New to the world of blogging? Setup Google Analytics for blogging and optimize your results. If you are wondering how Google Analytics helps, here is a brief description about the advantages of this essential tool and how to use it.
Benefits of Google Analytics
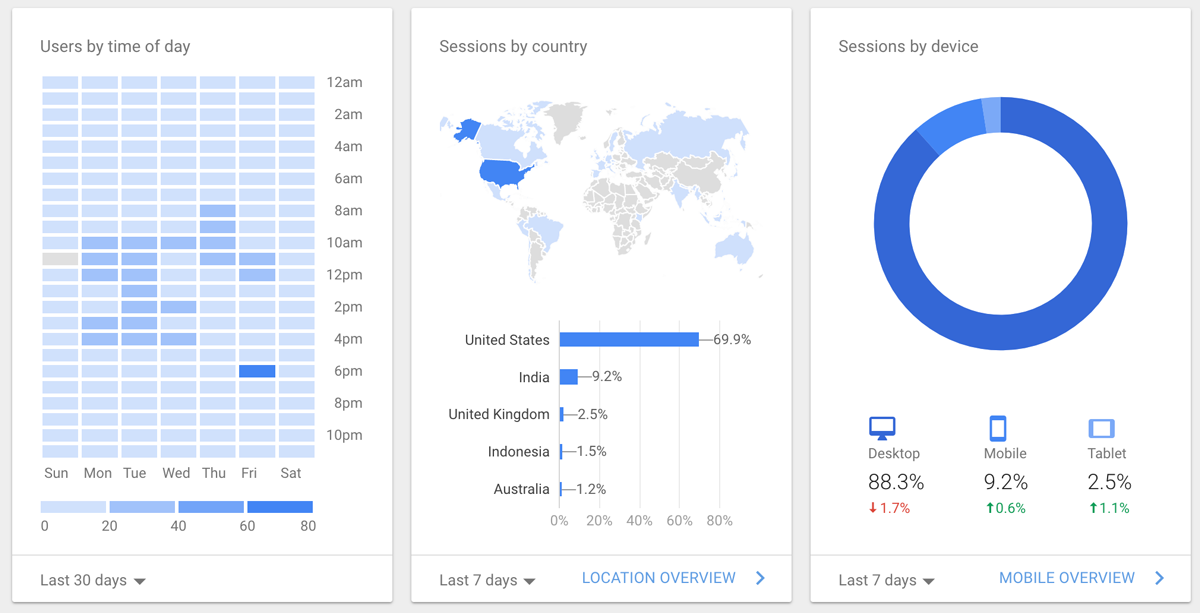
Google Analytics gives you first hand information about visitors.
- Real data – you can view who’s live on your site
- Keep track of number of visits per hour, per day, or per month
- See insights about referring websites and resources
- Learn about your reader demographics
- Narrow your audience down to geographies
You can also see the time readers spend on your blog. The best part… you get all these services for free!
Setting up Google Analytics for Blogging
For a beginner, it can be a bit demanding to set up Google Analytics. Adding Google Analytics to your WordPress blog is quite easy. You can install a plugin and insert your Analytics ID into that tool, or you can place the tracking code manually. For both the methods, you need to sign up for Google Analytics and perform certain configurations.
Three easy steps to set up the tool:
1. Signing up with Google Analytics
Go to www.google.com/analytics. That is the homepage. Now, log in with your Gmail id. You can create one in minutes if you don’t already have one. Next click on ‘Admin’ in the top menu. Now fill in the required information about your blog. You would fill in details like:
- Account name: High-level “folder” that will house data on all your related websites.
- Website name: Your blog name
- Website address: Your blog URL/address
- Industry/category: Select a relevant category according to your blog topic
Also, tick the recommended options to receive the Tracking ID.
2. Save your Tracking ID
Once you have received your unique blog tracking ID from Google Analytics, copy and save it carefully. You will have to place this ID in your WordPress blog template. Otherwise, you can install plugin.
3. Install Google Analytics plugin
If you don’t want to place your tracking ID manually, install a plugin called Google Analytics for WordPress. Activate the plugin. Now, go to Settings. Select Google Analytics and then enter your Tracking ID.
Once you have successfully set up the Google Analytics tool, you can start checking your visitor statistics. The tool may take around 24 hours to start functioning effectively. Later, you can check real data by searching for traffic screenshot.
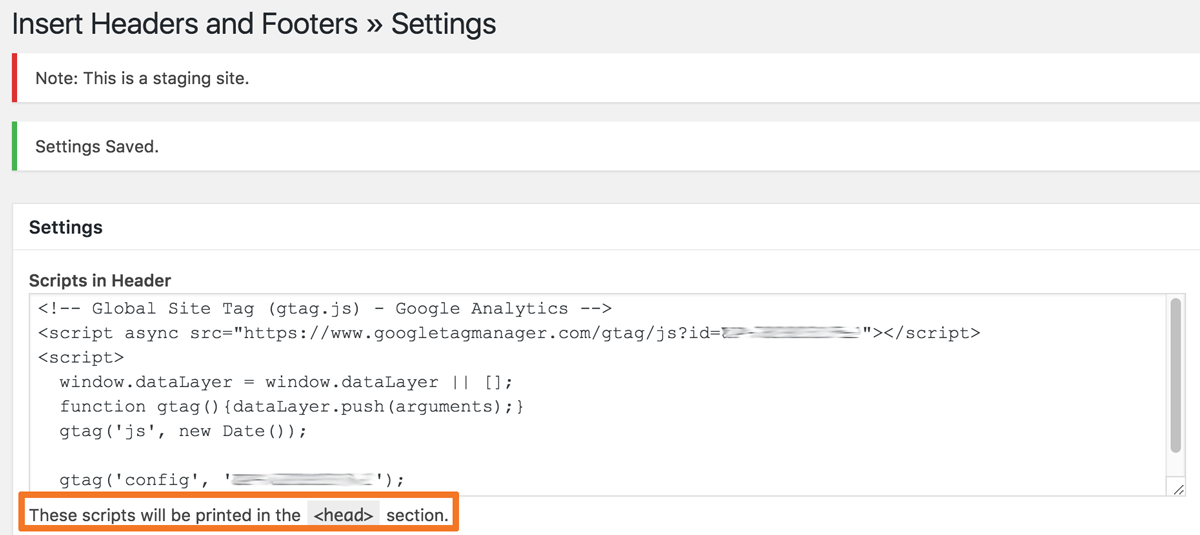
Here is an example of setting up Google Analytics using the Insert Headers and Footers plugin.
How to View Blog Posts in Google Analytics?
If you use Google Analytics for blogging you’ll want to see stats on individual posts. In order to see your blog posts, go to Behavior and then select Site Content. Go to All Pages. If you want to filter out pages that are not from your blog, click on ‘Advanced’ link next to Search option. Also, select ‘exclude’ instead of ‘Include’.
To save a filter, go to the admin tab in the bottom left sidebar. Go to ‘view’ and create a new filter. Then, save it.
Google Analytics can help you a great deal in viewing visitor statistics. It is a free tool but of great value if you want to analyze your visitor activity and use it for enhanced blog optimization.
Up Next: 12 places to look for inspiration for your blog topics!
Recent Comments